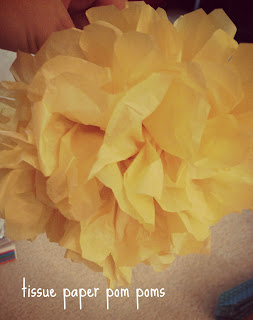
TISSUE PAPER POM POMS

if you are on pinterest, i'm sure you've seen these
if you're throwing a party, designing a nursery, or a classroom, etc. these add such a fun touch!
and they are easy and budget friendly to make, as well. :)
STEP ONE:
gather your materials. to make one large pom pom, you need scissors, some floral wire, and a package of tissue paper.

STEP TWO:
lay your tissue paper flat. i used 8 sheets for this pom (which is how many my package had.)
then accordion fold down the entire length of your tissue.


tip: if you want to make different sizes, cut the paper down before you start.
also, if you want to have a more full pom pom, you can add more sheets of paper. i have used anywhere from 8-12 sheets of tissue paper. play around with it until you find what you like!
STEP THREE:
take a piece of your floral wire (can be the covered kind or the uncovered kind), and fold it in half.
tip: i think my piece of wire was about a foot long. you want an overhang, so don't cut it too short.
place your wire over your folded tissue paper, and twist the ends to secure it in the middle. you want it as close to the center as possible.


STEP FOUR:
once your tissue is secured with wire, you'll want to make the ends look a bit more flower-like.
to do this you can either round the ends, or cut them into a point.


tip: it can be a bit tricky to cut through all layers of the tissue, so you can cut half first, then line it up to cut the other half.
STEP FIVE:
at this point, your pom should look like this:

what you want to do is to carefully peel open each layer of tissue and fluff it up as you go. once you've reached the end, turn it around and work on the other side. do only one half of the pom at a time!

tip: don't go too fast or the tissue can rip!
when you've finished separating each layer, fluff as full as you'd like it! :)
*sorry i don't have more pictures of this step, but it's very simple! just go slow and separate every layer of tissue :)
STEP SIX:
you're done! i like to make a loop out of the wire that's left, and tie some string to it in order to hang the poms wherever you are hanging them!


NOW I'VE MADE SOME, WHAT CAN I DO WITH THEM? :)
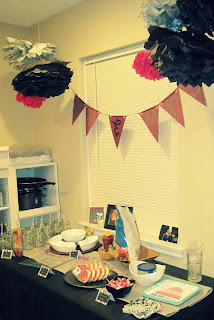
they look great for a party decoration over the food table, (i used some for a friend's bridal shower):

they are also such a sweet addition hanging in a nursery like here:
SOURCE
(also notice the anthro letters!) :)
THE BREAKDOWN:
to make 1 large pom pom (using the entire length of tissue), i used 1 pkg of 8 pc of tissue paper that i got at target for $1.29. this time i didn't have to buy any floral wire, but i have gotten a package of the (covered) floral wire at walmart for only a couple of bucks, and that will make many pom poms.
i also found a pack of tissue on sale for 99cents, and i cut it in half to make 2 smaller poms.
i like to have at least 3-5 poms to fill up whatever space i'm decorating. also i tried to use clear string (you can even use fishing wire) to hang them so you can't see it.
hope you try these next time you're decorating for a party! you can find tissue paper in pretty much any color (target had quite a few, but you could also try a store like party city for even more selection!)
ENJOY and HAPPY DECORATING! :)
Kristi...your directions are super clear and easy to follow...nice job:)
ReplyDelete