i have had a few requests on how to make a printable, and i'm here to show you an easy way.
today's make it monday:
sidenote: if you have photoshop, i think that's the best way to make one, but many people don't have that, and it definitely takes time to learn all the ins and outs of photoshop!
so for an easy beginner way to make a printable (ie: art you can print out), i use picmonkey.
*disclaimer: picmonkey knows nothing about this tutorial and had nothing to do with this post. i just like their website!
STEP ONE:
go to www.picmonkey.com
click on: edit a photo
(click on any of the screen shots to see it bigger)
STEP TWO:
upload a blank white page to start with.
i found mine HERE
also you need to decide on a quote! i saw this quote in someone's room posted on pinterest and thought it was sweet "so many of my smiles begin with you". :)
STEP THREE:
on the second button down, (looks like a chemistry bottle), scroll down until you see the "DRAW" tab. when you click on that, you want to pick a color you like for your background. i change the brush size to the largest size, and then cover the entire page with my choice. when you're satisfied, click "apply".
STEP FOUR:
next, click on the "P" tab (4th one down), and click on "add text". then type in your quote. for this particular quote, i did the first part of the quote in one text box, and the last part in a different box so i could change the font and size of each one the way i want. :)
change the font to one you like! and you can pick a color you want the font to be. many of the fonts are free, but some are available only to those who pay a monthly fee to upgrade to picmonkey royale.
STEP FIVE:
center them and make them how you want them to look. be creative! :) for this quote, i wanted the "YOU" to be a different font from the first part of the quote to set it apart a bit.
you can change the size by using the drop down box, or by typing in your own # of size to get it how you want it to look.
STEP SIX:
add a little doodle to spice up your quote. click on the shapes just below the "p" to see some premade shapes, or have a chance to upload your own.
i tried a heart, but i didn't love it.
so i went a few more down and found the bugs - and added a ladybug instead :)
you couldn't see the ladybug very well against the pink, so i went back into the "draw" tab and changed my background color.
the last step - don't forget to save your project (i like to use the biggest size) and then you're set!
once you've saved it, all you have left is to print it out!
i have used walgreens or shutterfly (always search for coupon codes!)
and i haven't tried this, but i'm sure you could also use photo paper and your own printer.
here's a bigger shot of the one made above:
here's a picture of one i made and printed out last week. i saw something similar to this on etsy so decided to try it for my gallery wall :)
the possibilities are really endless.
i found this other fun tutorial with more ways to use picmonkey HERE
have fun with it and happy creating!!
ALSO: if you'd like this "smiles" print, leave your email address in the comments section and i'll send it to you! :)
Monday, June 17, 2013
Thursday, June 13, 2013
thankful thursday: june 13th
i know i've said this before, but i am so thankful for my hubby.
here are a few reasons why:
he is so encouraging and helpful and has been showering me with compliments this week, making me feel so loved and special.
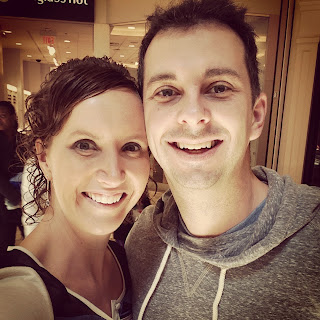
last week when i wasn't having the best day, he came home with a surprise frappucino treat and a hug for me! just to cheer me up!
he can read me better than anyone i know. he can sometimes tell what i'm thinking without me saying a word. still not sure how he does that, but it's pretty awesome :)
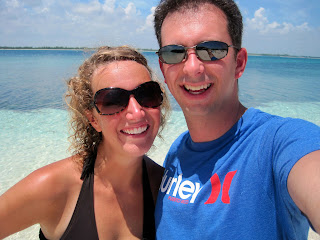
he pushes me to be a better person, to be brave, to be more adventurous, to keep learning, and to not give up, and even when things aren't roses (hello, it's real life so things aren't perfect!), he never gives up on me. through all the ups and downs and crazy adventures, i'm glad he's the one by my side.
love you honey! thanks for being on this adventure with me :)
here are a few reasons why:
he is so encouraging and helpful and has been showering me with compliments this week, making me feel so loved and special.

last week when i wasn't having the best day, he came home with a surprise frappucino treat and a hug for me! just to cheer me up!
he can read me better than anyone i know. he can sometimes tell what i'm thinking without me saying a word. still not sure how he does that, but it's pretty awesome :)

he pushes me to be a better person, to be brave, to be more adventurous, to keep learning, and to not give up, and even when things aren't roses (hello, it's real life so things aren't perfect!), he never gives up on me. through all the ups and downs and crazy adventures, i'm glad he's the one by my side.
love you honey! thanks for being on this adventure with me :)
Tuesday, June 11, 2013
tuesday treat: chicken dressing
today's treat is an old family recipe, passed down from my grandma (dad's mom) and my dad.
we grew up having this yummy dish sometime around christmas, and we always looked forward to having it!
a few years ago my dad taught me how to make it, and i have since made it for my hubby many times :)
it's one of our favorites.
GRANDMA'S CHICKEN DRESSING
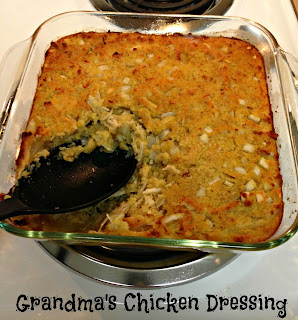
HOW TO MAKE IT:
*make a cornbread. i always use the jiffy box of cornbread mix (it's like 50 cents!) and it always turns out great :) make this before hand, (you can do it the day before) and give it time to cool, then crumble it.
*you also need shredded chicken, which can be done beforehand and frozen until you're ready to make it. i believe i used about 1 1/2- 2 chicken breasts for this recipe.
preheat your oven to 350, and spray your casserole dish.

*put your crumbled cornbread and your shredded chicken, along with one finely chopped onion into a bowl.

*cut up some butter and add it in. (i only use a few Tbsp, which is less than the recipe calls for)


add an egg:

next, you'll want to stir it all together well, and add in your spices. add some sage (to taste):

next you want to add some chicken broth. i always use swanson, reduced sodium. you can also use the chicken broth from cooking the chicken if you'd like!
i have figured out (through many times of trial and error) that you need about 2 cups of broth. what i like to do is add it to a glass measuring cup, and then heat it in the microwave for a minute before adding it to the bowl, as this helps to melt the butter. :)


also, add some salt and pepper. your mix should be "mildly soupy", which is basically just as it sounds. not too full of liquid, but not too dry. haha and not very easy to explain exactly! this took the longest for me to get the feel for, and it took a few times of making it to get just the right consistency. i promise it's worth it though. SO YUMMY :)

pour your mildly soupy mixture into your greased dish:

and top with some squares of butter:

bake at 350 for about an hour, or until a nice golden brown.

you could put this in a larger casserole dish or split it into 2 square pans to make it a little thinner, as sometimes i have noticed if i have it too thick it doesn't get as done in the middle. again, it's one of those you have to play around with a bit.

GRANDMA'S CHICKEN DRESSING:
1 1/2-2 chicken breasts, cooked and shredded
1 recipe cornbread, baked and crumbled
1 medium onion, finely chopped
1/2 stick butter, cut into pieces (save a few pieces for top of casserole)
1 egg
approx 2 cups chicken broth, (optional: warmed)
sage, salt and pepper to taste
combine all dry ingredients in a bowl.
make mildly soupy with chicken broth.
place in a greased casserole dish.
top with a few slices of butter.
bake at 350* for 45 min-1 hour, until golden brown.
from my family to yours, enjoy! :)
we grew up having this yummy dish sometime around christmas, and we always looked forward to having it!
a few years ago my dad taught me how to make it, and i have since made it for my hubby many times :)
it's one of our favorites.
GRANDMA'S CHICKEN DRESSING

HOW TO MAKE IT:
*make a cornbread. i always use the jiffy box of cornbread mix (it's like 50 cents!) and it always turns out great :) make this before hand, (you can do it the day before) and give it time to cool, then crumble it.
*you also need shredded chicken, which can be done beforehand and frozen until you're ready to make it. i believe i used about 1 1/2- 2 chicken breasts for this recipe.
preheat your oven to 350, and spray your casserole dish.

*put your crumbled cornbread and your shredded chicken, along with one finely chopped onion into a bowl.

*cut up some butter and add it in. (i only use a few Tbsp, which is less than the recipe calls for)


add an egg:

next, you'll want to stir it all together well, and add in your spices. add some sage (to taste):

next you want to add some chicken broth. i always use swanson, reduced sodium. you can also use the chicken broth from cooking the chicken if you'd like!
i have figured out (through many times of trial and error) that you need about 2 cups of broth. what i like to do is add it to a glass measuring cup, and then heat it in the microwave for a minute before adding it to the bowl, as this helps to melt the butter. :)


also, add some salt and pepper. your mix should be "mildly soupy", which is basically just as it sounds. not too full of liquid, but not too dry. haha and not very easy to explain exactly! this took the longest for me to get the feel for, and it took a few times of making it to get just the right consistency. i promise it's worth it though. SO YUMMY :)

pour your mildly soupy mixture into your greased dish:

and top with some squares of butter:

bake at 350 for about an hour, or until a nice golden brown.

you could put this in a larger casserole dish or split it into 2 square pans to make it a little thinner, as sometimes i have noticed if i have it too thick it doesn't get as done in the middle. again, it's one of those you have to play around with a bit.

GRANDMA'S CHICKEN DRESSING:
1 1/2-2 chicken breasts, cooked and shredded
1 recipe cornbread, baked and crumbled
1 medium onion, finely chopped
1/2 stick butter, cut into pieces (save a few pieces for top of casserole)
1 egg
approx 2 cups chicken broth, (optional: warmed)
sage, salt and pepper to taste
combine all dry ingredients in a bowl.
make mildly soupy with chicken broth.
place in a greased casserole dish.
top with a few slices of butter.
bake at 350* for 45 min-1 hour, until golden brown.
from my family to yours, enjoy! :)
Monday, June 10, 2013
make it monday: pom poms
today's project:
TISSUE PAPER POM POMS
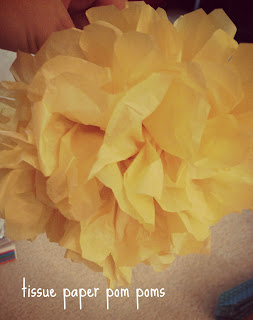
if you are on pinterest, i'm sure you've seen these
if you're throwing a party, designing a nursery, or a classroom, etc. these add such a fun touch!
and they are easy and budget friendly to make, as well. :)
STEP ONE:
gather your materials. to make one large pom pom, you need scissors, some floral wire, and a package of tissue paper.

STEP TWO:
lay your tissue paper flat. i used 8 sheets for this pom (which is how many my package had.)
then accordion fold down the entire length of your tissue.


tip: if you want to make different sizes, cut the paper down before you start.
also, if you want to have a more full pom pom, you can add more sheets of paper. i have used anywhere from 8-12 sheets of tissue paper. play around with it until you find what you like!
STEP THREE:
take a piece of your floral wire (can be the covered kind or the uncovered kind), and fold it in half.
tip: i think my piece of wire was about a foot long. you want an overhang, so don't cut it too short.
place your wire over your folded tissue paper, and twist the ends to secure it in the middle. you want it as close to the center as possible.


STEP FOUR:
once your tissue is secured with wire, you'll want to make the ends look a bit more flower-like.
to do this you can either round the ends, or cut them into a point.


tip: it can be a bit tricky to cut through all layers of the tissue, so you can cut half first, then line it up to cut the other half.
STEP FIVE:
at this point, your pom should look like this:

what you want to do is to carefully peel open each layer of tissue and fluff it up as you go. once you've reached the end, turn it around and work on the other side. do only one half of the pom at a time!

tip: don't go too fast or the tissue can rip!
when you've finished separating each layer, fluff as full as you'd like it! :)
*sorry i don't have more pictures of this step, but it's very simple! just go slow and separate every layer of tissue :)
STEP SIX:
you're done! i like to make a loop out of the wire that's left, and tie some string to it in order to hang the poms wherever you are hanging them!


NOW I'VE MADE SOME, WHAT CAN I DO WITH THEM? :)
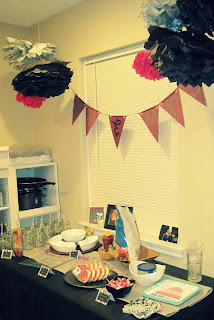
they look great for a party decoration over the food table, (i used some for a friend's bridal shower):
they are also such a sweet addition hanging in a nursery like here:
SOURCE
(also notice the anthro letters!) :)
THE BREAKDOWN:
to make 1 large pom pom (using the entire length of tissue), i used 1 pkg of 8 pc of tissue paper that i got at target for $1.29. this time i didn't have to buy any floral wire, but i have gotten a package of the (covered) floral wire at walmart for only a couple of bucks, and that will make many pom poms.
i also found a pack of tissue on sale for 99cents, and i cut it in half to make 2 smaller poms.
i like to have at least 3-5 poms to fill up whatever space i'm decorating. also i tried to use clear string (you can even use fishing wire) to hang them so you can't see it.
hope you try these next time you're decorating for a party! you can find tissue paper in pretty much any color (target had quite a few, but you could also try a store like party city for even more selection!)
ENJOY and HAPPY DECORATING! :)
TISSUE PAPER POM POMS

if you are on pinterest, i'm sure you've seen these
if you're throwing a party, designing a nursery, or a classroom, etc. these add such a fun touch!
and they are easy and budget friendly to make, as well. :)
STEP ONE:
gather your materials. to make one large pom pom, you need scissors, some floral wire, and a package of tissue paper.

STEP TWO:
lay your tissue paper flat. i used 8 sheets for this pom (which is how many my package had.)
then accordion fold down the entire length of your tissue.


tip: if you want to make different sizes, cut the paper down before you start.
also, if you want to have a more full pom pom, you can add more sheets of paper. i have used anywhere from 8-12 sheets of tissue paper. play around with it until you find what you like!
STEP THREE:
take a piece of your floral wire (can be the covered kind or the uncovered kind), and fold it in half.
tip: i think my piece of wire was about a foot long. you want an overhang, so don't cut it too short.
place your wire over your folded tissue paper, and twist the ends to secure it in the middle. you want it as close to the center as possible.


STEP FOUR:
once your tissue is secured with wire, you'll want to make the ends look a bit more flower-like.
to do this you can either round the ends, or cut them into a point.


tip: it can be a bit tricky to cut through all layers of the tissue, so you can cut half first, then line it up to cut the other half.
STEP FIVE:
at this point, your pom should look like this:

what you want to do is to carefully peel open each layer of tissue and fluff it up as you go. once you've reached the end, turn it around and work on the other side. do only one half of the pom at a time!

tip: don't go too fast or the tissue can rip!
when you've finished separating each layer, fluff as full as you'd like it! :)
*sorry i don't have more pictures of this step, but it's very simple! just go slow and separate every layer of tissue :)
STEP SIX:
you're done! i like to make a loop out of the wire that's left, and tie some string to it in order to hang the poms wherever you are hanging them!


NOW I'VE MADE SOME, WHAT CAN I DO WITH THEM? :)
they look great for a party decoration over the food table, (i used some for a friend's bridal shower):

they are also such a sweet addition hanging in a nursery like here:
SOURCE
(also notice the anthro letters!) :)
THE BREAKDOWN:
to make 1 large pom pom (using the entire length of tissue), i used 1 pkg of 8 pc of tissue paper that i got at target for $1.29. this time i didn't have to buy any floral wire, but i have gotten a package of the (covered) floral wire at walmart for only a couple of bucks, and that will make many pom poms.
i also found a pack of tissue on sale for 99cents, and i cut it in half to make 2 smaller poms.
i like to have at least 3-5 poms to fill up whatever space i'm decorating. also i tried to use clear string (you can even use fishing wire) to hang them so you can't see it.
hope you try these next time you're decorating for a party! you can find tissue paper in pretty much any color (target had quite a few, but you could also try a store like party city for even more selection!)
ENJOY and HAPPY DECORATING! :)
Thursday, June 6, 2013
thankful thursday: june 6th
this week, i'm thankful:
* for the sacrifices that all the service members and their families make to serve our country and to protect our freedoms
* that my husband was kept safe while serving, and that he is able to be home everyday now
* that we can pray for and support those who are fighting for us, and those waiting for their return
* that we live in a free country

Tuesday, June 4, 2013
tuesday treats: pancakes
Today's recipe is for a breakfast treat:
.jpeg)
PANCAKES!
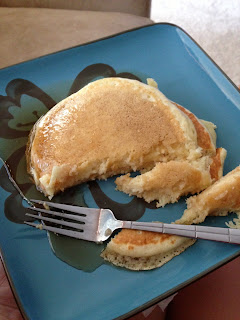
Last summer while visiting my dear friend Charissa, she was doing a couple weeks of eating no dairy. So we had to get a little creative with some of our meals. One of the recipes we stumbled upon was this pancake recipe using Almond Milk. We also added a few fresh blueberries and MAN were these pancakes yummy.
I've made them several times since, both with Almond Milk or with whole milk, with berries added or plain, and they are always delish!
Here's the recipe:
(I believe this is a Silk recipe from a magazine)
Makes 5-6 pancakes
1 cup all purpose unbleached flour
2 tsp baking powder
2 Tbsp sugar (i use organic sugar)
1/2 tsp salt
1 cup almond milk (other milk works also)
1 egg
2 Tbsp melted butter (can use coconut butter for dairy free)
Directions:
1. Whisk flour, sugar, baking powder and salt in a small bowl.
2. In separate bowl, whisk milk, egg and melted butter.

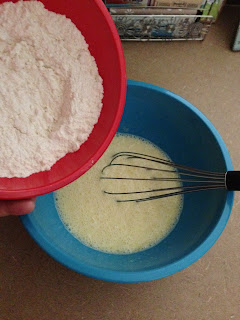
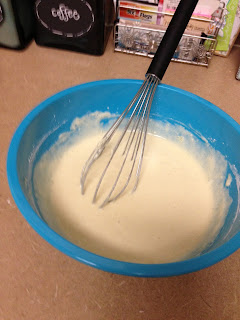
3. Add flour mixture to wet mixture and blend until moist.
.jpeg)
.jpeg)
4. Cook on heated griddle.
**tip: i use a measuring cup to pour the batter out
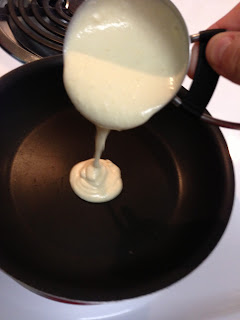.jpeg)
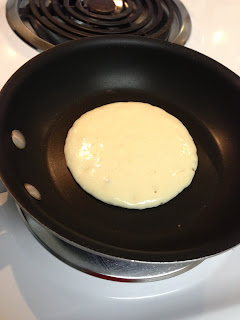.jpeg)
flip pancakes when you start to see little bubbles popping at the surface of the batter.
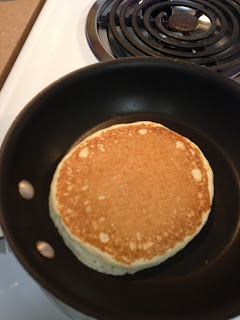.jpeg)
**tip: to keep pancakes warm while the others are cooking, place them on a plate with a towel covering them to keep the heat in!
This recipe is my go-to pancake recipe. :) I used to use Bisquick but I love that I know exactly what is in these pancakes and they are not hard to make at all.
Add a little butter and syrup on top and you've got a great Saturday morning breakfast for your family! :)
Enjoy!
.jpeg)
PANCAKES!
Last summer while visiting my dear friend Charissa, she was doing a couple weeks of eating no dairy. So we had to get a little creative with some of our meals. One of the recipes we stumbled upon was this pancake recipe using Almond Milk. We also added a few fresh blueberries and MAN were these pancakes yummy.
I've made them several times since, both with Almond Milk or with whole milk, with berries added or plain, and they are always delish!
Here's the recipe:
(I believe this is a Silk recipe from a magazine)
Makes 5-6 pancakes
1 cup all purpose unbleached flour
2 tsp baking powder
2 Tbsp sugar (i use organic sugar)
1/2 tsp salt
1 cup almond milk (other milk works also)
1 egg
2 Tbsp melted butter (can use coconut butter for dairy free)
Directions:
1. Whisk flour, sugar, baking powder and salt in a small bowl.
2. In separate bowl, whisk milk, egg and melted butter.

3. Add flour mixture to wet mixture and blend until moist.
.jpeg)
.jpeg)
4. Cook on heated griddle.
**tip: i use a measuring cup to pour the batter out
.jpeg)
.jpeg)
flip pancakes when you start to see little bubbles popping at the surface of the batter.
.jpeg)
**tip: to keep pancakes warm while the others are cooking, place them on a plate with a towel covering them to keep the heat in!
This recipe is my go-to pancake recipe. :) I used to use Bisquick but I love that I know exactly what is in these pancakes and they are not hard to make at all.
Add a little butter and syrup on top and you've got a great Saturday morning breakfast for your family! :)
Enjoy!
Monday, June 3, 2013
make it monday: rose cake
today's make it monday is also a yummy treat :)
2 LAYER ROSE CAKE
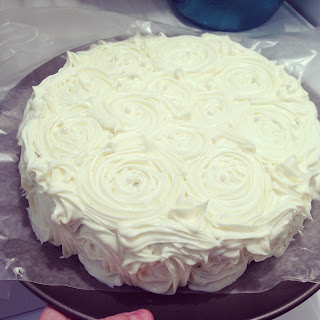
after posting the picture above a couple weeks ago of the rose cake i made for mother's day, i was asked how to do it and if it was difficult. it's really not very hard at all, so i thought i would post a "how-to" in case you'd like to try it yourself!
it has such a nice design, (it's very forgiving as well!) and it really doesn't take too long once you've made your cakes.
i've only tried this with store bought cake and frosting so far, and i definitely plan on trying it with homemade cake and frosting in the future! but here's what i have done the last few times i have made this cake.
STEP ONE:
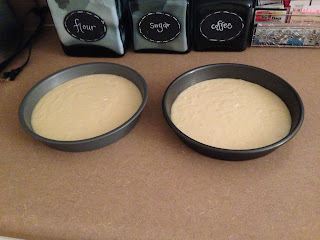
bake your cakes. you'll need 2 round cakes for this particular cake. if you make just one, it won't be tall enough on the sides for the roses. each box of cake mix will make 2 round cakes. bake according to directions on the box.
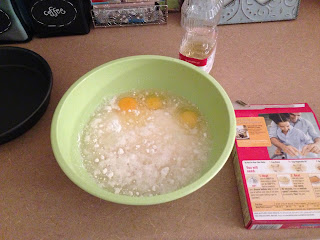
*tip: i always hand stir mine instead of using a mixer, and i always bake mine for a few minutes less than it says because i don't like my cakes overdone!
STEP TWO:
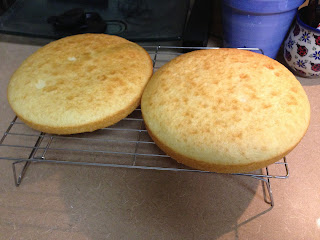
let your cakes cool completely. i take them out of the pan while still a bit warm and put them on cooling racks to finish cooling the rest of the way.
STEP THREE:
cut the tops of your cakes off to even them out to sit nicely on top of each other. this can be done with a knife, just carefully cut only the top off.


*tip: last time i made this, i used the cake crumbles from the tops to make cake pops! :)
STEP FOUR:
put some frosting on one of the layers, spread it out, and then layer the 2nd cake on top.


*tip: put the cut ends facing each other so that the top of the cake is the bottom of one of the rounds. this will make it flatter.

STEP FIVE:
crumb coat your cake. you can youtube videos on how to do this, but basically you're just putting a thin rough coat of frosting on the cake so that you can then cover it with the roses. once it's all the way covered, refrigerate the cake for just a few minutes to let it harden up.


STEP SIX:
while your cake is in the fridge, prepare frosting. for this cake, i added a few drops of green and blue coloring to make the roses easier to see :) you can use white (the most forgiving!) or any other color. i've also seen very fun ombre rose cakes on pinterest!
i used a wilton 1M tip. you can use a smaller one if you don't have this one, or you don't even have to use a tip, but it does look nicer with one.


put your tip in the bottom of your bag and then fill with frosting. you can use a resusable bag, a disposable bag, or even a ziploc bag!

i use these bags:

*tip: practice some roses over a bowl so that you can get the feel for how the frosting comes out
STEP SEVEN:
starting on one side of the cake, begin to make your roses. to make the rose, put the tip down and make a circular motion while using even pressure on the bag. (youtube videos are great for seeing this in action!)
try to get them to touch without overlapping. if you make a mistake, just simply use a knife to take the frosting off and try again! :)


STEP EIGHT:
once you have the sides covered with a row of roses, begin on the top. i work from the outside in.


you will have little spaces in between each of your roses. that's ok! we'll fill those up in a minute.

STEP NINE:
once you have the cake covered in roses (it goes quickly once you get started!), fill in your spaces. there are a few different ways to do this, but the way i do it is to put the tip of the frosting in the space and make a little swoop. fill in any spaces you find until the entire cake is covered in frosting.


STEP TEN:
i put mine back in the fridge for just a bit to harden it up. if you are using store bought cake and store bought frosting, you don't have to store it in the fridge - you can store it room temp as long as it's covered :)

when you are ready to serve, cut a piece! i love the layered look with roses on the top!
i hope you see this cake really isn't too difficult. give it a try next time you need to bring a dessert somewhere and you are bound to impress! :)

2 LAYER ROSE CAKE

after posting the picture above a couple weeks ago of the rose cake i made for mother's day, i was asked how to do it and if it was difficult. it's really not very hard at all, so i thought i would post a "how-to" in case you'd like to try it yourself!
it has such a nice design, (it's very forgiving as well!) and it really doesn't take too long once you've made your cakes.
i've only tried this with store bought cake and frosting so far, and i definitely plan on trying it with homemade cake and frosting in the future! but here's what i have done the last few times i have made this cake.
STEP ONE:
bake your cakes. you'll need 2 round cakes for this particular cake. if you make just one, it won't be tall enough on the sides for the roses. each box of cake mix will make 2 round cakes. bake according to directions on the box.

*tip: i always hand stir mine instead of using a mixer, and i always bake mine for a few minutes less than it says because i don't like my cakes overdone!

STEP TWO:
let your cakes cool completely. i take them out of the pan while still a bit warm and put them on cooling racks to finish cooling the rest of the way.

STEP THREE:
cut the tops of your cakes off to even them out to sit nicely on top of each other. this can be done with a knife, just carefully cut only the top off.


*tip: last time i made this, i used the cake crumbles from the tops to make cake pops! :)
STEP FOUR:
put some frosting on one of the layers, spread it out, and then layer the 2nd cake on top.


*tip: put the cut ends facing each other so that the top of the cake is the bottom of one of the rounds. this will make it flatter.

STEP FIVE:
crumb coat your cake. you can youtube videos on how to do this, but basically you're just putting a thin rough coat of frosting on the cake so that you can then cover it with the roses. once it's all the way covered, refrigerate the cake for just a few minutes to let it harden up.


STEP SIX:
while your cake is in the fridge, prepare frosting. for this cake, i added a few drops of green and blue coloring to make the roses easier to see :) you can use white (the most forgiving!) or any other color. i've also seen very fun ombre rose cakes on pinterest!
i used a wilton 1M tip. you can use a smaller one if you don't have this one, or you don't even have to use a tip, but it does look nicer with one.


put your tip in the bottom of your bag and then fill with frosting. you can use a resusable bag, a disposable bag, or even a ziploc bag!

i use these bags:

*tip: practice some roses over a bowl so that you can get the feel for how the frosting comes out
STEP SEVEN:
starting on one side of the cake, begin to make your roses. to make the rose, put the tip down and make a circular motion while using even pressure on the bag. (youtube videos are great for seeing this in action!)
try to get them to touch without overlapping. if you make a mistake, just simply use a knife to take the frosting off and try again! :)


STEP EIGHT:
once you have the sides covered with a row of roses, begin on the top. i work from the outside in.


you will have little spaces in between each of your roses. that's ok! we'll fill those up in a minute.

STEP NINE:
once you have the cake covered in roses (it goes quickly once you get started!), fill in your spaces. there are a few different ways to do this, but the way i do it is to put the tip of the frosting in the space and make a little swoop. fill in any spaces you find until the entire cake is covered in frosting.


STEP TEN:
i put mine back in the fridge for just a bit to harden it up. if you are using store bought cake and store bought frosting, you don't have to store it in the fridge - you can store it room temp as long as it's covered :)

when you are ready to serve, cut a piece! i love the layered look with roses on the top!
i hope you see this cake really isn't too difficult. give it a try next time you need to bring a dessert somewhere and you are bound to impress! :)

Subscribe to:
Comments (Atom)


.JPG)